Saturday, October 21, 2023

An update of sorts


 I suppose it’s normal to go through times of not posting, and letting life commitments get in the way of modelling. 


In my case, letting modelling get in the way of documenting anything rather noteworthy, but nonetheless a majority of things have been done and slowly becoming complete on other fronts. 


So, let’s cut to the chase shall we?


In late 2021 I started building what I deemed to be one of my more ambitious projects, modelling the NSWRTM/THNSW running set. The difficulty of this is the cars are so modified and altered from both government service and heritage service it made the process difficult. 


My first hurdle was constructing GMS 1. GMS 1 was an RBS carriage rebuilt by Northwest Coachbuilders from the early 2000s until its completion in 2004. The car has since operated with 3801 Limited, NSWRTM and now THNSW. This was achieved by using a Powerline BS car as the basis for the conversion, following photographs to create the car. Not a massive project, but one that cemented a lot of my early learning with the further development of my skill set. I learned how to use a bow pen as a result of this, and this has become something I’m rather interested in now. 


GMS 1, Powerline conversion. 


The next hurdle was the N cars. THNSW operates 3 N cars ex Set 131 being HN2197, CN1747 and RFN2187. The cars were a massive effort to complete being a mixture of 3D printed sides courtesy of Mitch Bailey of Ctrl-P Models, floors from Infront Models and the original Bergs kits. The Bergs kits leave a lot to be desired, and their design is rather rudimentary compared to other kits of the NSW prototype. These cars were built, assembled and 95% completed. They look complete, so it makes me rather happy. 


HN 2197. 

CN 1747.

RFN 2187. 


I then took the plunge into building MBE62. This car operated with 3801 Limited and now with THNSW. The base model was a Lima MBE with some serious cutting into. The crownlight were removed, the matchboard below the belt rail was removed and new upper and lower body sections were made. Not up to my personal standards, so I may yet redo this car in future when I construct the TBC to go in with the rake. 


MBE 62


I finished up with VHO1816 which was a very simple cut and shut using a Powerline KB guards van and a Lima 12 wheeler parts donor. The measurements were made, and body was cut to allow the fitting of the door. Some minor adjustments made including a basic underframe were done and we had the VHO finished. 


VHO 1816. 


The reasoning behind doing this rake is the majority of cars have operated with many many different locomotive combinations. Most notably in my mind is 3642 hauling these cars around in the early 2010s, and even in the odd occurrence 3801 would be seen hauling the cars in the 1990s (have only found one such instance in 1996 but hey, evidence is evidence and you can’t beat it without better evidence of the contrary). 


3642, SWT 5, VHO 1816, HN 2197, CN 1747, RFN 2187, FS 2093 and FS 2122. 


I’ve also managed to squeeze in a few custom jobs for myself and friends, and I hope this update does speak a thousand words in the photographic format, not my waffling in the word department. 


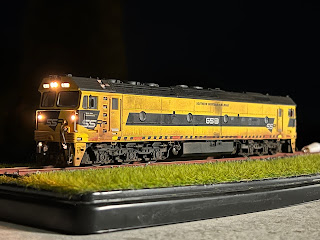
Auscision Models G513, weathered to depict G513 circa 2023. 

42107 was a custom renumber job from an Auscision 42109 in Interail. 


I’m hoping to have a few more things on the go by the end of this year to compliment my current direction of modelling, but one will eventually find out won’t they?


Thanks for reading and enjoy the semi irregular posting schedule I have employed of late. 


Cheers. 

Monday, January 18, 2021

ARM C38, Pt2

 Back to my post regarding the AMR C38.

I had always wanted a model of 3813 in the Cardiff outshopped streamlined green. It was different to all the other blunt nosed 38's, and it had a unique charm about it. 

The AMR model is pretty good dimensionally, and overall sits about right for a 38cl. It's far better than the Lima offering that was provided in the late 1970's and hopefully will form a staple in a lot of modellers fleets, due to how easy the engine can be detailed and updated.

I took to the engine with a chisel blade knife, bringing the oversize rivet heads down to a more acceptable size. They were easily fixed with something as simple as that. I then proceeded to start sanding down the boiler on the locomotive to remove the oversized boiler bands, valance and panels. It was a fairly straight forward thing to do, hit with 400g sand paper and then 800 to smooth it off. Just be gentle if you wish to do this.


The engine then went for a bath in some LA's totally awesome. I have a 2L container full of it, I find it to be a really good way of removing lining and paint. The LA's doesn't attack plastic, I have not had an issue with it as yet. It's not cheap to get a hold of either which is the problem ($15 AUD a 1L bottle) but it's invaluable in my modelling process. All the lining and transfers were safely removed.


I had previously altered the valve gear as the combination link as delivered is set for the engine to run in reverse. Not much of a point, an express engine isn't thought of doing that when you stare at it. The original rivet securing the combination link was removed with side cutters, soldered the original hole shut and drilled a 0.8mm hole in the bottom of the link, inserted some 0.8mm brass rod into the assembly and it looks far far better.

A new turbo generator (Mansfield 60cl), headlight and whistle (Kerroby 38cl casting), and a smokebox door wheel (Casula Hobbies) along with a proper smokebox door handle, grab irons on the sand box with some filling done on a mould line on the body completed the alterations to the body.


I have had a long standing feud with decals, and this shows. I had purchased an easi-liner pen some time ago for lining and it became a valuable tool in this paint job. The body was sprayed into an olive green off the shelf from Model Colour, and a custom colour for lining was mixed from a few Tamiya acrylics. Next time I go to do this, I won't use tamiya acrylics to line as they are a solvent based paint despite contrary belief. 

Lining was applied one side at a time, and there were some issues. I touched them up as best I could, clear coated the model and added the decals I had to add. 

Once cleared, cab side buffer beam and tender numbers were applied from various decal/etches to finish the model. I ran out of cab numbers so I only will show one side of the engine at this stage.

I am awaiting a Loksound V5 and a Ctrl P tender kit, to replace the ARM underframe with pivoting bogies, which should hopefully show up today.

Enjoy these images, and hopefully it'll encourage a resurgence into my modelling which has been very far and few between over the last few months. A few interesting projects on the way this year I hope, so we shall see what happens!


I also pulled out a few of my other 38's, including a Mansfield and a PSM just to compare the pair. I was extremely surprised at how well the modified ARM stood up to both of the other variations. so I'll include these images.


Also included is a 38 I'm doing for a gentleman in the united states. Hoping it will be finished soon.


Hope everyone is well.

Cheers. 

Tuesday, January 12, 2021

ARM C38 class - my thoughts

 Hi all, 

Long time between posts. Life and work are obviously a long standing commitment so I'll keep this short and sweet. 

Early March 2020 news circulated that another RTR C38 was to hit the market by a new company called 'Australian Railway Models' which is owned by Southern Model. Supply, the distributor of Hornby models in Australia. 

A sample of the non streamlined model was displayed, along with a sample of a forthcoming streamliner (which I hear is due this year, fingers crossed on that one).

The model became available in November 2020 and it has probably been one of the best models released in recent times. Many people have began modelling and altering these models to better represent a 38. At $300, it's hard to turn down. 

The engines come with the expansion link set in reverse, so some alteration can fix that pretty easily. They lack a whistle, decent headlight and a smokebox door wheel. Just changing those items leaves you with a really decent looking engine. 

I have 2 of my own presently, one of which has a Eureka Models 3801 body fitted to, along with a Ctrl-P models tender underframe kit. 

3813 has been a long time goal to model and I'm edging closer to the finish line with it. 

The model has had a number of alterations, such as:

Sanding down over emphasised detail on the boiler, smokebox and valances 

Replacement of the headlight, turbo generator, smokebox door wheel, and the fitting of a whistle 

Adding grab irons to the sand box.

And a full repaint into the 1960's streamlined green. 

I'll include some images of the models I have in a future post, including alterations done to create the models I now have. 

Cheers. 


Saturday, July 27, 2019

A lesson in electricity

Hi all,

Has been a long time between posting on this blog. I have been doing odds and ends as usual, which is how life goes. Models come and go as I do odd jobs for some friends (I've probably weathered close to 70 wagons in the last month) so you could say I've learnt a bit about that haha.

Anyway, today's topic is about electricity, namely learning about the application of resistors with DCC, and lights.

I recently fitted a Tsunami 2 Steam 2 to my Eureka Garratt, as a replacement for the aged QSJ decoder of 14 years in the locomotive. The installation was easy, and following the instructions allowed me to get a locomotive running within about an hour, with a keep alive well. I had followed the recommendation of adding 1/4 watt, 580k resistors to the headlight anodes to allow the LED's to work in the loco. I over compensated and used 1/2 watt 580k resistors instead.

The lights didn't work, and I was puzzled.

I recently purchased a DJH 38 with a sound decoder, which I didn't like so I proceeded to install a Tsunami 2 1100 and a Soundtraxx KA. I wired up the headlight previously fitted with a 1/2 watt 580k resistor, removing the original one. Reassembled and tested, but the headlight wasn't working even though it did before. I scratched my head and wondered, am I using the correct resistor?

Turned out I wasn't. I reinstalled the original resistor this morning, and the headlight lit up like a Christmas tree.

Here is the subject of my learning curve today:


Subsequently, I will have to pay more attention when I fit lights to locos...

More updates of normality will recommence soon...

Cheers!

Sunday, March 17, 2019

Black oiling locomotives

Hi all,

Just a quick post today. I had in my mind a way to get a black oiled appearance on a steam locomotive which involved using Tamiya Line Accent. This is was something I wanted to try for some time before actually doing it properly today.

What is black oiling?

Black steam locomotives were often 'spruced' up with a layer of black oil to give the locomotive a glossy finish. This was something commonly done with locomotives used for enthusiast specials or even by some depots as a regular occurrence in the steam era.

Straight panel line is poured into an airbrush and sprayed at around 25psi. When spraying, ensure you're not spraying too much product otherwise you can get runs. A light spray just to give a basic emphasis over the paint to darken it ever so slightly as black oil was used for. You can build up coats just to get the final finish.

Here are some photos of the finished loco.

Cheers

Wednesday, March 6, 2019

Painting the AC state car

Hi all,

I recently commenced building a Lloyds AC state car. Easily, one of the nicest kits I have come across. It's a theme with the old milky bar kits how simple and well thought out they are.

The kit went together fairly straightforward, with no major hiccups. The end handrails and etching for the end platform are a bit of a prick, but that's a given with the nature of the kit.

The carriage was dismantled to be painted, with the body and underframe being primed separately. I use Tamiya fine surface primer, a very forgiving primer to use I've found.

Once everything was primed, the underframe was hit with XF1 flat black from Tamiya. I'll have to redo it a bit later, but it's not an issue right now.

I picked up some Tamiya XF9 Hull Red and XF55 Deck Tan to paint the car. The whole carriage was painted in the Hull Red, and then left to dry. A mixture of 10mm, 3mm, 1mm and 0.7mm masking tape was used to mask off to paint the cream. What a prick of a job.

Anyway, here is where we are at now. I plan to fit some Casula 2AA bogies and lower it a little, but not today. I do plan to add the rest of the lining at a later date...

Cheers


Sunday, February 17, 2019

ALCo's of all sorts

Hi all,

Just a quick few images of some recently weathered 48's and a 45. 4833 is a renumber job as is 4821. 4833 is an Auscision 48 fitted with a Tsunami 2 with a sugar cube speaker in the rear, and 4821 is a Powerline with a Tsunami 2 Atherns board mounted with a sugar cube. 4821 still needs some numberboard decals and is almost there.

4512 is an Auscision 45, with a Tsunami 2 and a decent coat of grime.

Also included is an image of my ever growing export grain train. It'll be around 35 wagons long when complete.

Enjoy.

Cheers
4833 is a renumbered Auscision Mk1 48. Representing a clean but used 48, it also doubles up as a preserved loco. Just very subtle weathering to tone it down a touch. Infront Models kindly provided me with the nose numbers and Ozzy decals were used for cab numbers. 


4821, a renumbered Powerline 48. Ozzy decals on the side with a liberal coat of grime to the body.  I need to add nose numbers yet but that's low on the priority list. 

4512 is a 45 sold to me as a dummy however it had a motor and all the electronics in it. Score! Weathered it up and have ran it ever since, it's one of my favourite locos. 

ALCo triples. Will be seen very often on my export grain. 

42203, 4833 and 42101 slowly ease their loaded grain train through Maitland. A place where 422's and 421's were rarely ever seen, however this is modelling.